Search This Blog

Translate

Wednesday, March 11, 2015

Master Closet Remodel and installing wood floor.


Remodeling the MASTER BATH ... 
closet ... vanity room and shower


Our master bath is actually three rooms  just off the bedroom.

... the walk-through vanity room
 
... the walk-in closet
  
... the shower/toilet room 


These rooms had not been totally 'put back together' and redecorated since the damage done to the walls when we had the total house plumbing replacement in September of 2013. I just could not spend time and money redecorating when I hated the rooms as they were.   


the CLOSET
 We started working on the closet in September 2014 ...

It is an 8'x9' carpeted walk-in closet and dressing room.
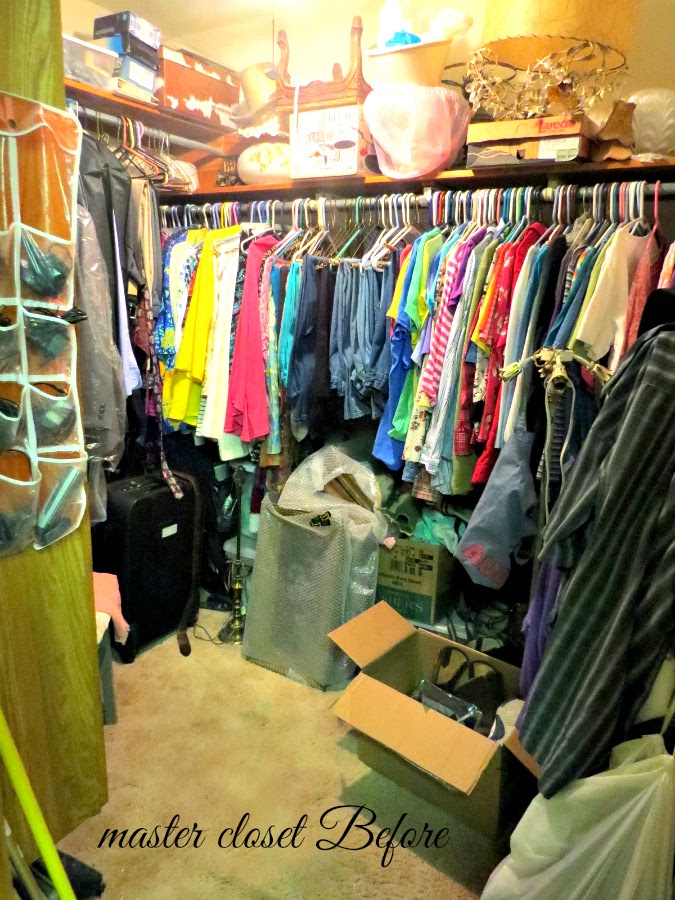

We removed everything in there to the guest bedroom; our bedroom or wherever we could find an empty spot. 
The guest bed was piled high with clothes and junk was everywhere all of October, November,  December and most of January.  
We purged and donated a lot of clothes and shoes to Hospice and CAM (Christian Assistance Ministry).

You can see that we stored more stuff than just clothes.

 When the call came from our contractor Son that his demolition crew would be here in two days to start gutting the shower/tub/toilet room, 
the closet was closed and put on hold.

***link to Part 1 of the shower room can be seen below.

October and most of November, both of us were dealing with health issues with Mr. Z. spending three days in the Hospital. This time was also spent removing the dust created by the remodel of the shower ... getting ready for Thanksgiving and Christmas ... we also made the changes in the rods and shelves; painted the entire closet and installed the two storage shelves. Then we were waiting on the guys to come remove the carpet and install the wood floor.
 
 
Remodeled shoe-shelf was hung on the wall.

Floor is done and we are starting to move back in.  


You can see how we made the top shelves level in the corner

... moved the rod up and added a short rod between the wall and the shoe shelf.


AFTER
We still use the shelf above the rod to store stuff, but looks a little neater now. I am also slowly replacing the colorful plastic hangers with clear plastic hangers.

Behind the door ...
I used a vintage chrome-plated towel rod for hanging scarves and a thrifted tie rack. 
Love the mounting brackets on this old rod. 

The front of the door has an over-the-door mounted mirror with belted brackets. (see Belted Brackets link below)


This is the builder made, wall mounted shoe shelf with five slanted shelves ...  useless !!!

We removed it from the wall ... took it completely apart ... made the shelves flat; painted it white and attached it to the wall on the opposite wall.
And you can see, it has become a useful shoe shelf. 

This is the free-standing shelf  that we put in the place of the mounted slanted shoe shelf.                                                                        It had been used for storage in the garage. We painted it white and added legs so it would be easy to clean under. It still holds the same three pair of Mr. Z's shoes and room for a lot of other items.We moved our socks to baskets and bins and freed up two large drawers in our vanity room. 

 
This part of the rod was designated for long skirts and dresses.  There is still lots of room under them for my old painted trunk, blankets and such.  
Picture below is the same corner before. 


  BEFORE pictures of what was stored on the shelf above the rod.

Little up-side-down stool waiting to be recovered ... how many years?

Now ... I hope I can just remember where I put all this stuff.  


After of the shelf above.

We were also able to move our winter coats in here from the tiny hall closet.

We are so happy with the way this turned out. 
Just hope it will stay organized. 
and YES ... we have a ceiling fan in the closet. 


Before 

After


 Thanks for the visit ... hope you will say hello before you leave.


Belted Brackets  
over-the-door mounted mirror can be seen here.


Bath remodel-before-and-after. Part 1 


Linking to: 
It's Overflowing
ItsOverflowing

The Sunday Showcase Party By Stephanie Lynn


Friday, January 30, 2015

Belted Brackets.Tortilla Soup and Friend Indeed.

Master closet remodel.

The master closet is part of our bathroom area.
 
It is actually three rooms 

... the walk-thru vanity room
... the walk-in closet
... the shower/toilet room 


Mid September 2014, we started cleaning out the closet so we could make some changes, organize and get rid of a lot of stuff.  The closet is 8'x9' carpeted walk-in.

This is a BEFORE picture
and we had already boxed and bagged some stuff.


We removed everything in there to the guest bedroom; our bedroom or wherever we could find an empty spot. The bed was piled high with clothes and junk was everywhere. Then finishing the closet was put on hold and finished in January 2015.


No, it did not take that long!  Delay was due to gutting and remodeling the bath area ... dust removal; two months of health issues; Thanksgiving; Christmas and waiting for the floor men to remove the carpet and lay the hardwood floor in the closest.


The shower/tub/toilet room remodel was finished well before the end of September 2014.
Pictures are before and after of the same corner where the shower was.

Reveal coming soon ... I promise !!!


 Closet reveal coming soon too,

but I did want to show you the over-the-door mirror we hung on the closet door ... 

and tell you about tortilla soup 

and a sweet friend indeed.


Originally, we had a cheap mirror hanging on a wall in the closet with lots of nails in it. It had aged; was "ghosty" and the frame was broken. So this time, I opted to hang a new cheap mirror on the door. This one had over-the-door adjustable brackets which worked out just fine, but the exposed brackets with the notches were not very pretty. 


So figured out "a cover-up".
 I belted it !!!
 
The belts just go up to the edge of the door ... no room for them to lap over. 

Glad I had saved several worn-out belts when I cleaned out the closet.
 

 I did not have two belts the same size, so had to cut one in half to make the two straps, and took a buckle from another larger belt. Not the same, but who will notice.

I stapled the belt together to hold the buckle and belt loop in place. Used a little hot glue for extra security. Rounded the end and put black shoe dye on cut areas.
The hole was punched with a icepick.


I assembled the first strap ... cut it to size ...

and used the extra to finish the second strap. 

I used hot glue to mount them to the brackets ...


Before, with the door open ...
... and you get a peek at the shelf in the closet which is on the left side of the door. 

 
After, with the door closed. 

Reflecting part of the wall of cabinets and drawers in the vanity room and the open doorway into our bedroom.

The vanity room will be the next remodel project and the blue wallpaper will be coming down.

NOW ... for the friend ...

 
What is ... "a friend in need is a friend indeed"? 
This means that a friend who helps you when you really need help is a true friend.

 This post is a little late in coming, but I just wanted to say how great it is to have friends that care.
 
I had been sick for almost five weeks October/November and just about totally confined to the house. 

Finally; able to leave the house, we took a day trip to spend time with our daughter on her birthday. 
When we got home, we found a sweet care-basket that had been left on our front porch. 
  
... a nice wicker basket lined with a beautiful yellow napkin;
 a quart of homemade tortilla soup ... grated cheese ... colorful tortilla chips 
and Cinnamon Spice tea.
 
She recommended that I drink the tea with honey 
for the raw throat. 
Sweet note too. 

I met Cecilia this summer when she came to our annual community garage sale. 
 
She lives only a few miles from us.

We have a lot in common so becoming friends was easy. 

Cecilia is a very kind lady ... so sweet and caring.                  ... and makes the best tortilla soup filled with veggies and big tender chunks of chicken.                
So special ... it called for my large antique soup cup.
You can see, it is almost as big as the saucer. 

Cecilia blogs @ My Thrift Store Addiction.
Hope you will hop over to see her.  
She will keep you inspired.

Maybe she will even share her tortilla soup recipe with you.


 Her nice wicker basket was just perfect for the Mandarin oranges Mr. Z. brought home on Friday.

The soup was quickly gone ... 
but I will enjoy the basket for a long time. 

Yes ... I got well ...

the soup helped ... 

the tea helped ...

the prayers helped ...

and it helps to have friends who care. 

Thanks Cecilia ...

Linking to: 
Rattlebridge Farm 
Foodie Friday and Everything Else

Rooted in Thyme Sweet and Simple Friday

Monday, December 29, 2014

Decorating with Bottle Brush Trees

I am sure most of you are 'done' with seeing Christmas decoration but here are some I did not get time to post before Christmas.
I have a sizable collection of vintage bottle brush trees but this year I enjoy bleaching and dying the new ones. 


Pictures will speak for themselves. 

Trees inside a tree.


... in a birdcage with ironstone and silver ...

... old metal cogs anchor this tree

new bleached trees ... love how they turned out. 


antique mercury glass deer ornament 
and $ Store white trees. 

With these last two pictures, you are getting a peek at the antique, re-purposed kitchen cabinet that I put in our remodeled bathroom.
Reveal coming soon. 

This old Snowman loves his bottle brush tree and a happy snowman on the right that has just gathered a wagon load of snowballs. 

Santa Claus and Mrs. Claus took their old beat-up Tonka truck to the tree farm. 
(no cab, so now it is a convertible)


I have had these figures for years and did not realize they were knee huggers until I was stuffing them in this truck.


Looks like she is flirting with Santa. 


 This vintage car is about 12" long 
This had to be the worse tree on the lot.


This little car is only about four-inches long but he can carry his tiny tree in his rumble seat. 

I asked our grandsons (21 and 23) why this back seat, out in the weather, was called a 'rumble-seat'.
Both whipped out their cellphone and Goggled it.

Very interesting, at least they thought it was. 

Went back in time ... a bench/seat on the back of a carriage for footmen or servants.   

 Also, in an automobile ... called the mother-in-law seat 
or honeymoon seat.
Too long to go into details here ... 


This vintage, crinkle-wire-wrapped, 
mercury glass tree topper hangs upside down on the chandelier over the dining table.
 
 Happy New Year 2015 

Linking to: 


Sunday, December 21, 2014

We finally trimmed our tree.

YES, WE DID ... 

we trimmed our tree.

Last year, one-half of our small oak tree in the front yard died and we removed that limb. 


This year the other limb died and we trimmed it off because I wanted that perfect limb to put on our front porch to hang Christmas lights on. 
 
I climbed an 8' ladder and took seven feet of that limb up to the ceiling of the porch. I cut the end at a bevel to fit flat against the header ... mounted it with two large screws and suspended it at the middle from the ceiling. 

(this was scary, up so high)

... added 100 LED white lights ...


... and about 145 plastic icicles or prisms.

 
... to hang the icicles/prisms; we drilled tiny holes in each one and added wire to the top.

... icicles are vintage 1950 ... I suspect they were lamp prisms.
I put the same style prisms on my recycled porch chandy when I made it years ago. 

 
... now I have a tree limb loaded with icicles ... looks really cool.

... wish I had painted the limb white but thought about using it all year with other decorations ...

Party Every Monday NightThanks Donna for featuring this blog. 


Linking to: 
Make it Monday #16Make It Monday
Distressed Donna Down Home 
    co-host Tamara from Etcetorize


Related Posts Plugin for WordPress, Blogger...