Tuesday, September 27, 2016

... it lived happily ever-after !

what can you do with an old wooden ironing board?
         
What can you do with an old wooden ironing board ?   
IRON clothes, of courses ...         
 

No WAY !!! 

so, what did I do ?   
I made a cutting board. 

  a Farmers' MARKET cutting board.
 
36" long and about 12" wide ... this sucker is heavy. 
Left one side plain and will likely add another sign.


 The three small knotholes add a little bit of charm.
(middle hole is where I removed a brad holding the legs on).
I added a little bit more charm with cut marks.
... oiled and waxed

 
... drilled a one-inch hole in the handle for hanging.

Now WHAT? 
  
... laid it on my dining table. 

... added bleached leaves and burlap pumpkins from the Dollar Tree. 
I painted some white and some jade green. 


... threw out a little candy corn.


... added white candles in an old Mason jar. 

... added place settings for French Onion Soup and
now we are ready for a nice Fall supper.  

... remove the decoration and use the board to sit the food on.


Happy Fall ...
Thanks for the visit.
I hope you will say hello.
 For more inspiration for Fall, check out
Fall In Love With Texas Blog Tour
20+ blogger 
Blog will go live on October 3rd ... through the 7th
  
Monday
Tuesday
Wednesday
Thursday
Friday

My post will appear on Wednesday, October 5th. along with these other Texas bloggers.


Friday, September 9, 2016

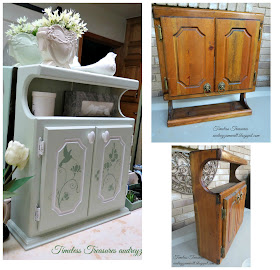
Flipped Up-Side-Down ... Bathroom Vanity Cabinet


I had been looking for a long time for a small cabinet for my newly remodeled bathroom.     (see links of remodel at end of post)
It would be sitting it on the vanity cabinet in front of this huge 80's unframed mirror, so height was not a problem, but I needed it to be about six inches deep and about twenty-four inches wide.


When I found this at my favorite Thrift store for $5.00, Finds Fabulous Resale.  I thought it would work ... although I needed the doors at the bottom ... so I flipped it, 
(well, just turned it up side down) to make it work.

 It was well made pine wood, likely 70's/80's. 
It was designed to be hung on the wall, but no indication if it had ever been hung. All the edges were beveled, so the first thing was to make a base for it so it would safely stand. 

I shopped my woodworking shop and found this piece of an old treadle sewing machine top that was the perfect fit after I cut the depth down.

Next, I had to remove the shelf because I needed more height in the bottom shelf . 
  
I could not just remove the shelf because it was nailed and jointed into the side. My DeWALT  Reciprocating Saw did the trick.

I put a thin shelf up higher using a scrap piece of wood flooring.
It also needed a back.


I bought this vintage wooden blind many years ago and have loved using the slats for many projects. To keep them flat, I strapped them together so they won't warp.
Using the center part of the slat, I was able to make a slatted back for the cabinet. 
I will find another use for the scrap pieces.


   I used a nickle for spacing between the boards, whitewashed them but later painted them with the soft minty green of the cabinet. 

  Used a hot iron and wet cloth to remove the long scratch across one door.

Hot steam will swell the soft grain and scratch will almost disappear. Paint covered it easily.


Stenciled the doors using cosmetic foam wedges for the Dollar Tree. The stencil color matches the color of the mirror frames, the header and the little wooden tray for Mr. Z'z razor, etc. 

The reflection of the sliding "barn vintage door" closes off the shower/toilet area.


Colors are not exactly true because of the fluorescent lights.  

Hope you enjoyed my make-over of this cute little cabinet. 

You can see more of the master bath/shower/vanity/closet by checking the links below.  

Before and After ... Master bath 
Breaking up the frameless mirror
Mirror frame fix with mold-it
Not all keys are for locking doors
Sliding door Master Bath
Wood floor and Master Closet make-over

Antique mirror for master bath

Thanks for your long visit. Please say hello.
Audrey Z. 

Linking to :
Let's Add Sprinkles ... Monday Social #2 
The Dedicated House ... Make it Pretty Monday
Vintage Charm #47 and   Let's Talk Vintage #99 BellaRosaAntiques