
Mailboxes are great for more than just receiving mail. (Some pictures were taken long before I even heard about blogging.)

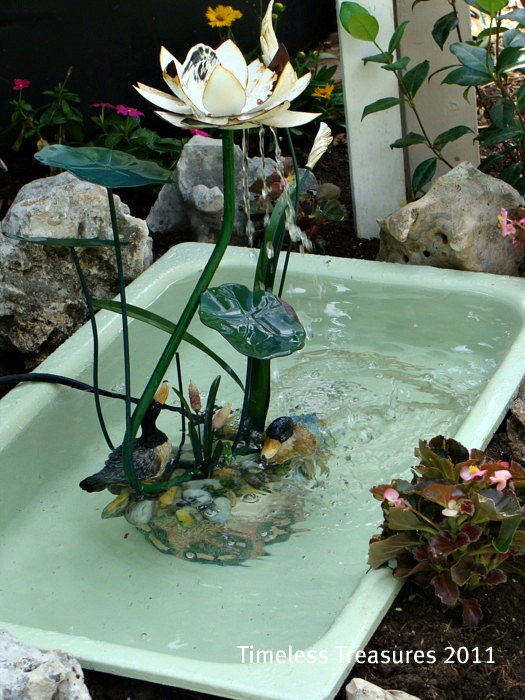
The pond below is a re purposed cast iron kitchen sink and the fountain was made from an artists metal sculpture.
 The second mailbox with a potted plant in the cut-out and a bird's nest in the open door sits on top an old rusty milk can in another landscaped area. My collection of spades lean against the post just waiting for someone to dig up the garden. The wind turbine in the background is an enjoyable whirly-gig when the wind is blowing.


Cut the rim off a plastic plant pot ... lay it on top the mailbox, center it and mash it down to draw the circle for a cutting guide.
 I used my electric jigsaw with a fine-toothed blade for cutting metal. First drill a large enough hole inside the circle for the blade so you can set the saw guide down on the mailbox. Have two blades on hand, because they are easy to break. Go slow and don't pressure the blade as it might break. I know that ... but I broke my blade and did not have another one and had to finish cutting the last three inches with a hand saw. (Slow) ... Protect your eyes from bits of flying metal. Rough edges can be filed down.

Once cut, you are ready to paint and decorate your box.
Get a plastic pot that is flexible and push it down into the opening or use a plant already potted. Paint it the color of your mailbox and it will blend right in. This mailbox that I am showing will be painted and decorated with a number 5 ... just because I like that number.

Thanks for visiting ... hope you enjoyed my mailboxes
and I will get a note from you.
Looking forward to a good year for green grass and pretty flowers.
Blessings.
Linking to: Funky Junk Interiors SNS
Knick of Time Interiors
ivyandelephants What's It Wednesday
Re purposed mailboxes to planters.
 (Some pictures were taken long before I even heard about blogging.)
We converted our wood fireplace to gas so we no longer needed the rack where we stored our firewood, so I turned it into my potting shed or "playhouse". Just in front of this and under the eave of our workshop, was a big black rainwater catchment tank (seen behind fence) and not a pretty view when sitting in my "playhouse". 
I took this piece of picket fence that I had bought for no reason and built a landscaped area to hide the tank. Now I have a pretty view with my very own mailbox; a shelf for birds and birdhouse and a little pond for the frogs. The mailbox on top of the post has a cascading plant in the top and also one in the open door area.
The pond below is a re purposed cast iron kitchen sink and the fountain was made from an artists metal sculpture.
 The second mailbox with a potted plant in the cut-out and a bird's nest in the open door sits on top an old rusty milk can in another landscaped area. My collection of spades lean against the post just waiting for someone to dig up the garden. The wind turbine in the background is an enjoyable whirly-gig when the wind is blowing.
This is how to make the mailbox planter.  This one I am demonstrating is my favorite because it has the U.S. Mail flap on the little door. These are hard to find.
 This one I am demonstrating is my favorite because it has the U.S. Mail flap on the little door. These are hard to find.

Cut the rim off a plastic plant pot ... lay it on top the mailbox, center it and mash it down to draw the circle for a cutting guide.

 I used my electric jigsaw with a fine-toothed blade for cutting metal. First drill a large enough hole inside the circle for the blade so you can set the saw guide down on the mailbox. Have two blades on hand, because they are easy to break. Go slow and don't pressure the blade as it might break. I know that ... but I broke my blade and did not have another one and had to finish cutting the last three inches with a hand saw. (Slow) ... Protect your eyes from bits of flying metal. Rough edges can be filed down.

Once cut, you are ready to paint and decorate your box.
Get a plastic pot that is flexible and push it down into the opening or use a plant already potted. Paint it the color of your mailbox and it will blend right in. This mailbox that I am showing will be painted and decorated with a number 5 ... just because I like that number.

and I will get a note from you.
Looking forward to a good year for green grass and pretty flowers.
Blessings.
Linking to: Funky Junk Interiors SNS
Knick of Time Interiors
ivyandelephants What's It Wednesday


