

It would be sitting it on the vanity cabinet in front of this huge 80's unframed mirror, so height was not a problem, but I needed it to be about six inches deep and about twenty-four inches wide.


When I found this
at my favorite Thrift store for $5.00, Finds Fabulous Resale. I thought it would work
... although I needed the doors at the bottom ... so I flipped it,
(well, just turned it up side down) to make it work.
It was well made pine wood, likely 70's/80's.
It was designed to be hung on the wall, but no indication if it had ever been hung. All the edges were beveled, so the first thing was to make a base for it so it would safely stand.

I shopped my woodworking shop and found this piece of an old treadle sewing machine top that was the perfect fit after I cut the depth down.
 Next, I had to remove the shelf because I needed more height in the bottom shelf .
  I could not just remove the shelf because it was nailed and jointed into the side. My DeWALT Reciprocating Saw did the trick.
I put a thin shelf up higher using a scrap piece of wood flooring.
It also needed a back.
 Using the center part of the slat, I was able to make a slatted back for the cabinet.
I will find another use for the scrap pieces.

 I used a nickle for spacing between the boards, whitewashed them but later painted them with the soft minty green of the cabinet.
Used a hot iron and wet cloth to remove the long scratch across one door.


Hot steam will swell the soft grain and scratch will almost disappear. Paint covered it easily.


The reflection of the sliding "barn vintage door" closes off the shower/toilet area.
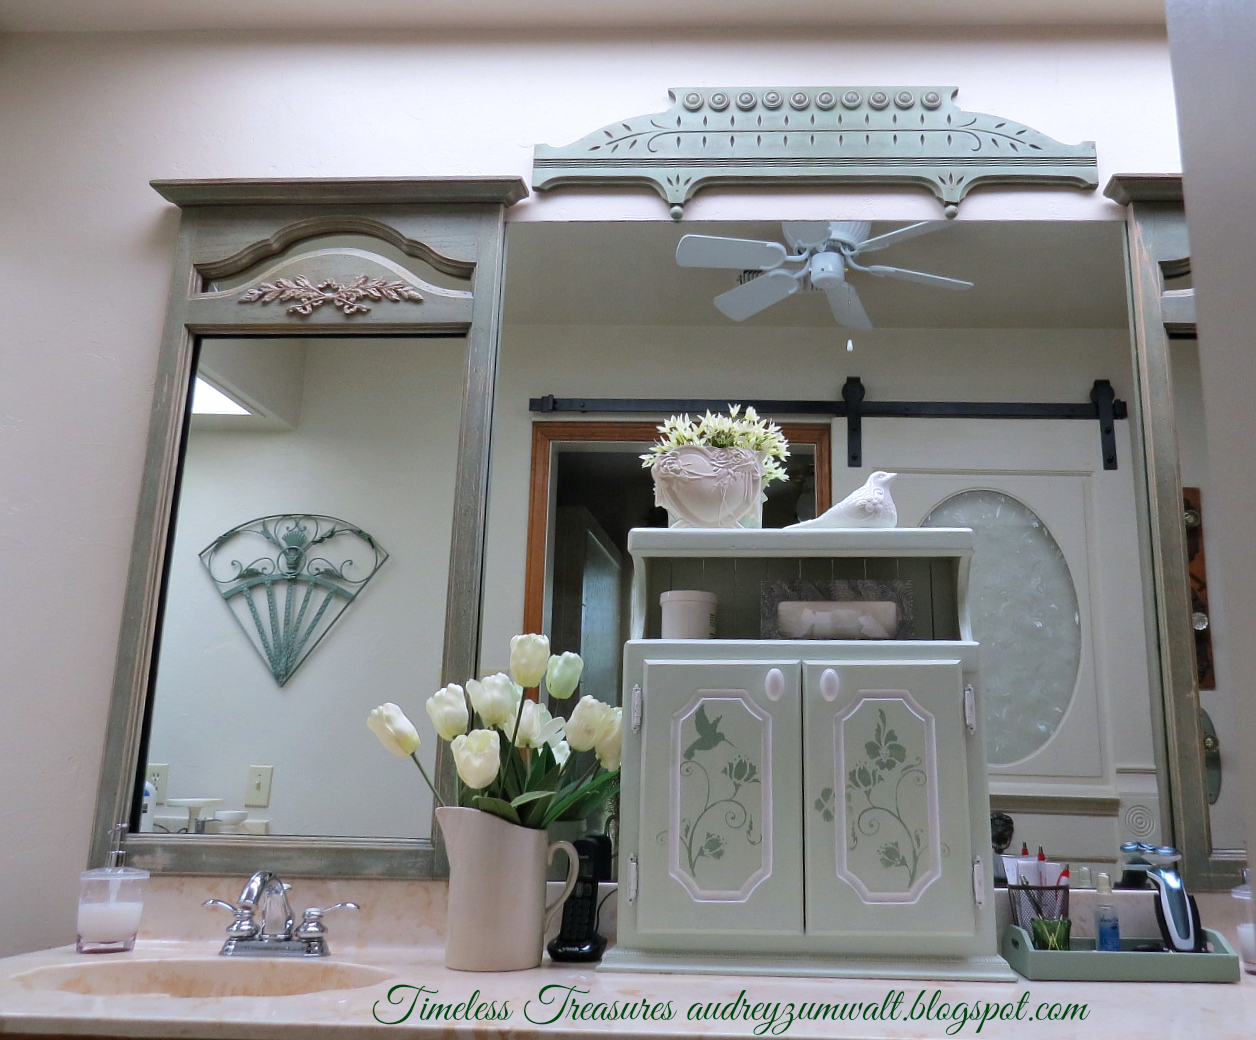


Colors are not exactly true because of the fluorescent lights.
Hope you enjoyed my make-over of this cute little cabinet.
You can see more of the master bath/shower/vanity/closet by checking the links below.
Before and After ... Master bath
Breaking up the frameless mirror
Mirror frame fix with mold-it
Not all keys are for locking doors
Sliding door Master Bath
Wood floor and Master Closet make-over
Antique mirror for master bath
Thanks for your long visit. Please say hello.
Audrey Z.
Linking to :
Let's Add Sprinkles ... Monday Social #2
The Dedicated House ... Make it Pretty Monday
Vintage Charm #47 and Let's Talk Vintage #99 BellaRosaAntiques
You invent the best stuff Audrey. The 'up'cycled little cabinet looks just right in your bathroom.
ReplyDeleteJoy
Omigosh! What a brilliant idea - great work Audrey!
ReplyDeleteWhat a great idea to flip it upside down! I just drove by a freebie cabinet the other day with a similar style to yours, but with less character. Kicking myself now for leaving it on the side walk!
ReplyDeleteyou made a timeless treasure from that plain little cabinet love it xx
ReplyDeleteHi monkey ...always glad to have you visit me. Thanks for the nice comment.
DeleteHope you see this reply since you are a no-reply-blogger and I could not email you.
Audrey, I love that you flipped that little cabinet upside down. It turned out beautifully.
ReplyDeleteFlipping the cabinet was such a clever idea and it turned out lovely, Audrey. Your stenciling is gorgeous! Thank you for sharing @Vintage Charm! Pinning!
ReplyDeleteIt looks great, Audrey! Really smart to flip it upside down too. Also thanks for the tip for removing a scratch. How cool is that?
ReplyDeleteGreat transformation and I especially love the tip about using wooden blind slats for backing. Give a girl a saw and she can transform anything!
ReplyDeleteIt turned out beautiful! I could never think of doing all that let alone doing it myself! So talented you are! Nancy
ReplyDeleteActually, I LIKE the colors!
ReplyDeleteAnd what a beautiful work of art Audrey!! Wow.
What a great way to look outside the box! Thank you for joining Mondy Social.
ReplyDeleteAudrey,
ReplyDeleteA great tip for removing a scratch in wood.... Your renovated cabinet fits your bathroom space perfectly. Thank you for sharing at Monday Social.
Judith
OOO, Audrey....this is FABULOUS...cutest thing, ever...I would never have thought to flip it...and I love the stenciling ....great job
ReplyDeleteAudrey, what a fabulous idea! I see these cabinets quite often and always pass them by. Next time I am bringing one home!
ReplyDeletexo Dianne